Showing posts with label Easter. Show all posts

Thursday, April 24, 2014

Bunny Cakes

Over the last few years, the girls have really enjoyed making Rice Krispie bird nests for Easter and begged for us to do them again this year.  However, a good friend posted the most adorable bunny-shaped cakes on Facebook, and I knew we should try something brand new this year.  They turned out pretty cute, and a couple of people asked me to make a tutorial on how to make them.

They are cute... they are bunnies... what's not to LOVE?!

So the best part about these little guys is that you do not need a special pan, just a regular round pan.  We ended up using store bought cake mix, store bought frosting, and strawberry jelly from the fridge for a filling.  First cook two round cakes.  It is easiest if you remove them from the pan while they are still warm.


The best thing to do now is let them cool completely, wrap in plastic wrap, then put in the freezer for a few hours, or even over night.  The next day pull them out of the freezer and place the first cake "round" side down, flat side up.  Spread a glob of jelly and spread around to almost the edges


Spread a glob of jelly and spread around to almost the edges.

 
Take the other cake and place it flat side down on top of this cake.  The two flat sides will be together for this.  Normally a regular double round cake you would not do this, because it would make the top and bottom of the cake curve.  However, we are standing each half of this up on it's end, so rounded bunny haunches will be just fine.  At this point, the cake is still pretty frozen.  You can take a large knife and cut right through both layers of cake

Each half of this cake can make one bunny cake

Now we want to turn this cake up on it's end.  I put a strip of wax paper under our first attempt, which turned out pretty tricky to pull out later on.  I would recommend putting this half circle right on whatever you are going to serve it on and frost it from there.  Now that the cake is up on it's side, we need to "carve" the bunny shape out.  Starting a little past center, and with a sharp knife, carve down into the cake right where bunny ears might go.  Leaving a section at the bottom to become the "face" of the bunny.


Don't throw away the piece you cut away, flip it upside-down and place it at the back end of the bunny to create the "tail" area.  Now comes the frosting.  We were in a rush and just decided to use the store bought frosting from the can.  This can be a bit messy as there really isn't a way to do an efficient "crumb coat".  Because the cake is semi/frozen, frosting is a tiny bit easier.  It's still akward though, just because the shape of the cake is so odd.


After you have a good layer of frosting on, take a knife and smooth it over.  Another option is to immediately press sweetened coconut over the whole thing to mimic bunny fur.  The girls are not big fans of coconut, so frosting it is.  We repeated the steps because we wanted both a brown bunny and a white bunny


Here's a good shot of the round parts of the cake on the outside, with the flat parts of both cakes on the inside.  Reminds me of big giant hamburger.


We got smart on the second one, and place the cut half right where we were going to serve it.  I put small strips of wax paper underneath so we could frost without making a mess on the serving tray, and the small strips are easier to pull out after you are done frosting.


Cut the same shape out and frost the same way.  While those are sitting, you can make bunny ears.  We just used construction paper and cut an ear shape the same colors as our bunnies, then glued a slightly smaller ear shape in pink for the center of the ears


Next we took the ears and taped them to the ends of toothpicks.  We did this so paper would not be resting on frosting and soaking up moisture.  This way the ears would last over night and survive travel time the next day to grandmas without getting mushy near the frosting.


My daughter was the one that wanted to make a bunny face.  She thought toothpicks would make great whiskers.

The brown and white bunny were for Easter, the blue bunny the girls made for our dessert that night
We placed the ears above the head line, and they worked perfectly.  We used two regular sized chocolate chips (with the tips pointing in) to make round bunny eyes, and we used a large candy corn flavored MnM (left over from Halloween) but any round candy will work for a nose.  You could also use a pink jelly bean.  After that we pulled out the wax paper from the bottom so our little blue bunny was sitting proudly on our cake plate.


We then gave the brown bunny her face


And the white bunny her face


You can't see it, but we put rainbow sprinkles on the white bunny's tail, and we put chocolate jimmy sprinkles on the brown bunnies tail.  All in all these were a big hit at the family Easter dinner the next day!


These are so cute for Easter, but would be equally adorable at a bunny themed birthday party or ladies spring tea function.  I also realized with just a few tweaks here and there, these could easily be converted into car or VW bug shaped cakes.  Have fun cake carving, remember, if the cake is frozen, it will be a lot easier to cut and frost!

Monday, April 14, 2014

Color Coordinated Egg Hunt

Well I don't know what your Easter Bunny was up to last year, but ours had a absolutely BRILLIANT idea about a color coordinated Easter Egg Hunt.

A color coordinated Easter Egg hunt is the way to go!
Not only did it solve a number of problems due to the age differences between cousins... but the kids had a BLAST!!

A color coordinated Easter egg hunt.  Each kid was able to find their favorite colored eggs.
In the past, on a regular Easter egg hunt, we have had some issues with the older kids getting a lot more eggs than the smaller ones.  Either that or the older ones would pick up the really easy ones because they were quick to grab, rather than leaving them for the 5-year old to find.  Well this year, the Easter bunny left a note for all the kids:


Each of them was assigned a specific egg color.  This was fun because the Easter bunny happened to know what each kid's favorite color was.  Jacob, for example, loves all things orange (if you can't tell), and the Easter Bunny had assigned him all the orange eggs.


Avelyn's favorite color in the whole wide world is purple... so she got all the purple eggs assigned to her


Here is Avelyn in action now.. she was hard to photograph in her "natural" setting of a full sprint.


Eva finding pink ones (they match her bunny AND her dress):


While Viv finds the blue ones (cause they match her eyes - the Easter Bunny KNOWS!!)


This also made it so the Easter Bunny could put the older kid's colored eggs in the more camouflaged or hard to reach/taller places.  Gabe really had to work to find some of his more challenging green eggs.


We could not believe how well this type of hunt turned out!  We even had kids helping each other find their colored eggs.  It was amazing.

A good time was had by all at our color coordinated Easter egg hunt
We loved how the Easter egg hunt turned into an absolute success!  We had kids helping kids, big kids helping little kids.  Little kids spotting eggs and pointing them out to the older kids... AND everyone got about the same number of eggs in their favorite colors!


It was a win win for everybody.   So if you have a big group of family or cousins that get together for a big Easter dinner and an egg hunt, have your Easter Bunny try out a color coordinated one this year and watch the fun and camaraderie commence!  We will definitely be doing a color coordinated event this year and every year to follow.


Saturday, April 13, 2013

Baby Bird Nests

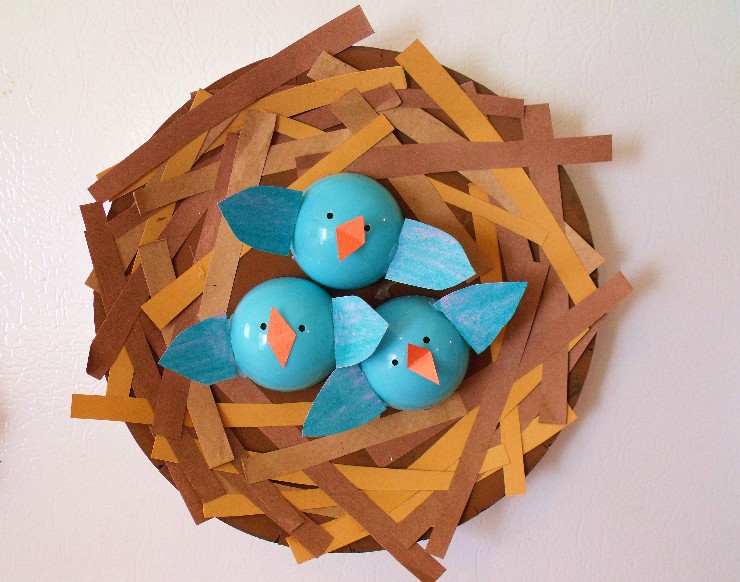
For the first time in a long time, it was a pajama all day kind of Saturday.  I have been saving this craft as a surprise for the girls until after Easter, when I knew we would have some extra plastic eggs lying around.  It was such a fun, hands-on craft and it turned out down right adorable.  How can you not love these tiny baby birds all snug in their nest?

Little baby blue birds with their beaks open... feed me feed me
I got the idea from the Busy Bee Kid's Crafts website and fell in love with it the moment I saw it.  Here are the items you will need to make this craft:

Plastic eggs
Construction paper (shades of brown, orange, and colors to match for wings)
Dessert sized paper plate
Brown paint
Paint brush
Scissors
Glue - your choice (multiple kinds, glue stick, rubber cement, glue dots or hot glue gun)
Note: Lay down some old newspaper to protect the work area

Here's how to make it:

First, paint the paper plate brown.  I used an extra plate to load the paint on.  A wider brush worked best to spread the paint around. Try to cover the whole thing and let it dry.

you could also buy brown plates but I had trouble finding that shade.  These black ones were from Walmart
Each of my girls had a different painting technique.  The middle child ended up accidentally using the plate that had the starting paint on it, but spread all the goop around and it worked out fine.  My youngest made harder brush strokes (middle picture) that actually gave it a "wood grain" look, and my oldest painted with concentration and precision.  


While your brown plates are drying it's time to work on the baby chicks.  We tried to find eggs that were lighter and pastel in color, to make them look more like baby birds.  We also tried to to use the shorter, rounder end of the egg.  The two air holes were in the perfect position to make "eyes".

The rounder bottom of a plastic egg shell.  You need one for each baby bird you will make
The nests have room for two or three baby birds.  You want to fold a small piece of orange construction paper together and cut tiny triangles out to make the wee little beaks.  We tried several different glue methods, and I guess it depends on your patience level for which one you choose.  Glue dots would have been my first choice, but we were out, and since I didn't want to run to Joann's in my PJ's, we then tried rubber cement.  We found out that does take some tedious time holding the folded beak in place as the glue dries, but it did work.

Baby birds, now with beaks!
My husband suggested we try the hot glue gun after that.  It worked MUCH quicker however, mom and dad had to be the only ones to place the glue and the girls gently put the beaks on without touching the glue.  We also cut out some wings that matched the color of our baby birds.  You want to make a wing shape that has a small fold at the end, so it attaches to the slick egg surface better.


Cheep cheep
Most construction paper is only in bright primary colors.  To get our wings to color coordinate with our pastel birds, we took some pale blue paper and colored it with color crayons in a shade that was close to our birds.  Here is a whole "army" of baby birds with matching wings.


these baby birds are mighty colorful!  Love it.
While your baby chicks are setting up, it's time to cut up some brown construction paper strips for the nests.


We used two shades of brown construction paper, and I also cut up parts of a brown paper grocery bag to get a lighter brown color.  Using a glue stick this time have the kids put glue on each strip, or "twig" and layer them around the outside ring of the brown paper plate.

Messy but glorious fun
I forgot to show a nest being built in progress (we were having too much fun) however after a few layers it will start to look like a "real" nest.  We couldn't resist putting our baby birds in there to see how they liked it.


Look at these faces!!
 
mama!
Each person chose their own color birdies to make.  Even Mr. D got in on the action and made a nest too.


Top left: oldest, top right: middle child, bottom left: baby, bottom right: hubby
Since the hot glue gun was still blazing, we hot glued the birds securely in their nests.  Then, in a moment of brilliance we decided to glue a strong magnet to the back of each nest, so we could display them on the refrigerator.  How cute is this??!!

Baby bird nests lovingly displayed on the fridge
It turned out to be a great place to display our handy work.  It is such a great reminder of new life in spring time.  These were so fun to do as a family Saturday craft project.  I hope you get a chance to do them too!


Monday, April 16, 2012

Strawberry Banana Trifle

What dessert did I make for Easter dinner this year you ask?  Well I made a fun, fabulous, floofy dessert otherwise know as a Strawberry Banana Trifle (thanks for asking). Do not fear!  Though Easter is already passed, you do not have to make it just for holy holidays though, no sir!  A trifle makes a nice, beautiful, easy dessert anytime through the spring and summer months with any seasonal fruit of your choice.  Kids love it, grown ups love it.  It is a sure fire win and has that elusive "wow" factor that cookies or cupcakes just can't deliver.


Ain't she a beaut?  Well the nice thing about this one is that it is a very family friendly recipe.  My 4 year old helped me put it together, which is why is doesn't quite have that military precision of a super fancy Martha Stewart concoction such like this:

Wow.  Now that's precise.

The other nice thing about trifles in general is that you can make them just as fancy as you want, or you can just chill out and layer as you go.  Choice is up to you.  

Mine above is a tad more casual and laid back.  Of course I could spend extra time and effort aligning all the berries, but my brother and nephews are just going to scarf it up as fast as humanly possible anyway.  Plus it was rather fun to let my little one dump in the layers as we went along and help me.  She was having a blast and let me assure you it will taste the same regardless. The only caution about trifles is to NOT do what Rachel did on Friends, where two pages of a cook book stuck together and she made half trifle, half shepherd's pie.  Ug I believe the layers were lady fingers, jam, beef, custard, and peas.  I think the verdict was it "Tastes like feet".

For a non-foot tasting trifle, gather the following plus bananas (not shown).
(click here for a printable recipe )

angel food cake, strawberries, 2 large boxes vanilla pudding, cool whip, bananas, and milk
*Make this entire recipe sugar free by having sugar free versions of cake, pudding mix, and whipped topping 

First, you want to prep your ingredients beforehand.  Take your store bought angel food cake and cut it in half.  Turn each half into one-inch cubes. 
Make your vanilla pudding mix and set aside, wash and chop up strawberries but save bananas until right before you start layering.  Also the size of your trifle bowl will determine how much of each ingredient you will use, because you want enough room for 2 full layers.  For a extra large family trifle I will put half the angle food cake, half the pudding, half the fruit and half the whipped cream and layer that twice, but for that you will need a pretty big bowl.  My mom's trifle bowl that I borrowed turned out a bit on the small side, but I came up with an ingenious solution that I will show you in a minute.

Next start the layering process.  Drop in angel food cake then cover with pudding...
    Add a layer of strawberries and then a fresh cut layer of bananas.

Next add a layer of cool whip (this can also be home made whipped cream) Then repeat the process for a second full layer of angel food cake (tip: once the 2nd layer of cake is in, press down gently to help lightly pack down the first layer), then continue with the pudding, strawberries, bananas and finish off with whipped cream.


By the end you should have something that looks like a fancy dessert.  Now what do you do if you do not have a trifle bowl on hand?  Well I came up with a perfect solution when I started to stare at the container the angel food cake came in from the store.  If I turned it upside down it could easily become a make shift trifle bowl.  What?  I'm a genius!
Presto!  Upside down angel food cake container becomes a trifle bowl
This really came in handy for me because my mom's trifle bowl was a tad on the small side for our big family,  so all the left over ingredients went in here for a second trifle.


Next all you have to do is store it in the fridge for a few hours to let the flavors meld.  Matter of fact, you can make this the day before and let it set overnight.  Then on Easter all you have to do is whisk it out of the fridge and throw it in the car for the trip over to grandma's house.


And here it is safely at Grandma's house next to the other Easter goodies.  Super easy, super fun, and super delicious!

Friday, April 06, 2012

Rice Krispie Bird Nests

So with spring and Easter in the the air, I knew I wanted to make some little edible bird nests as a craft with the girls.  In years past I have used both shredded wheat and Chinese crunchy noodles as the nest base, and both of them taste pretty much like you are eating actual twigs. Not good.  So this year I decided we would use rice krispies to make the nests, because who doesn't LOVE rice krispy treats!

Easter egg rice krispie bird nests - how adorable!

These turned out really cute and here are the supplies you will need to make them:


Think just like regular rice krispie treats, only we are going to make a slightly larger batch than normal, and add jelly beans or Robin Eggs at the end to complete the "nests".

First find a large bowl and spray down with cooking spray.  Fill with 9-10 cups of rice krispies (Tip: put in 9 cups and keep a reserve cup to the side so that after you get the marshmallows in, you can gauge if you need the 10th cup).  Set bowl aside and off to the stove to make the marshmallowie goodness

  
Melt five TBSP of butter in a pot (also sprayed with cooking spray), and then add the marshmallows.  I used the extra large 16oz bag, and even added a few from another bag to make sure there was enough ooze to go around.


Once the marshmallows are melted down to goo, pour them over the bowl of waiting rice krispies. (Tip: if you spray your spatula with cooking spray the mess won't stick to your stir stick).

Now here's where it gets ooey gooey and messy Bessy. The kids LOVED this part, but take a small amount of butter and rub it on your hands like soap.  It's a weird, greasy feeling, it might even feel very wrong, but believe me it will really help you have the sticky mess stay off your hands and where you want it to go.  Let the mixture cool to a reasonable temperature that kids can handle (just nice and warm) and form into balls.  Have some sheets of wax paper laying near by and place the ball of crispy goodness down on it.  Gently, while keeping one hand on the outer shape, use your thumbs or fingers to make a nest shape with an indented center


Slather more butter on your hands if needed and work quickly before the krispies have time to set too much.  My girls were having so much fun with the butter.  We were done with this part but my middle child grabbed an extra pat of butter just to squish between her fingers.  Ug.  But she was having fun so I let her have her fun.

Next grab the little jelly beans or mini robin eggs (I liked the speckled look) and place them however you would like in the nests.  We tried all one color (like the baby blue bird eggs) or multi colored too.  Three eggs looked best but there were many number combinations throughout all the nests.

 
Then just let sit for a while and set up into a solid shape.  They pop right off the wax paper and I stored them in a lidded cupcake storage container with wax paper between the rows so they wouldn't stick together.


So cute, fun to make, delicious, and great not only for Easter and spring time, but anytime you want your kids to have some textile tasty fun!

Here's the printable directions:

9-10 cups rice Krispies
5 Tablespoons butter
16oz bag of marshmallows
Robin Eggs or small jelly beans
extra butter for hands
wax paper
cooking spray

Spray large bowl w/ cooking spray, add in 9 cups (+1 reserve cup) of krispies
In a pot, melt 5 TBSP of butter and add large 16oz bag of marshmallows (plus a few extra if you got them)
Once melted pour over waiting rice krispies and stir (add extra reserve cup of Krispies if needed)
When cooled to a temperature a child can handle, form into balls
Place balls on wax paper and gently form into a nest shape with indented center
Place jelly beans or small Robin Eggs in the center and let them set
Store in an air tight container and enjoy!

Related Posts Plugin for WordPress, Blogger...