Saturday, April 13, 2013

Baby Bird Nests

For the first time in a long time, it was a pajama all day kind of Saturday.  I have been saving this craft as a surprise for the girls until after Easter, when I knew we would have some extra plastic eggs lying around.  It was such a fun, hands-on craft and it turned out down right adorable.  How can you not love these tiny baby birds all snug in their nest?

Little baby blue birds with their beaks open... feed me feed me
I got the idea from the Busy Bee Kid's Crafts website and fell in love with it the moment I saw it.  Here are the items you will need to make this craft:

Plastic eggs
Construction paper (shades of brown, orange, and colors to match for wings)
Dessert sized paper plate
Brown paint
Paint brush
Scissors
Glue - your choice (multiple kinds, glue stick, rubber cement, glue dots or hot glue gun)
Note: Lay down some old newspaper to protect the work area

Here's how to make it:

First, paint the paper plate brown.  I used an extra plate to load the paint on.  A wider brush worked best to spread the paint around. Try to cover the whole thing and let it dry.

you could also buy brown plates but I had trouble finding that shade.  These black ones were from Walmart
Each of my girls had a different painting technique.  The middle child ended up accidentally using the plate that had the starting paint on it, but spread all the goop around and it worked out fine.  My youngest made harder brush strokes (middle picture) that actually gave it a "wood grain" look, and my oldest painted with concentration and precision.  


While your brown plates are drying it's time to work on the baby chicks.  We tried to find eggs that were lighter and pastel in color, to make them look more like baby birds.  We also tried to to use the shorter, rounder end of the egg.  The two air holes were in the perfect position to make "eyes".

The rounder bottom of a plastic egg shell.  You need one for each baby bird you will make
The nests have room for two or three baby birds.  You want to fold a small piece of orange construction paper together and cut tiny triangles out to make the wee little beaks.  We tried several different glue methods, and I guess it depends on your patience level for which one you choose.  Glue dots would have been my first choice, but we were out, and since I didn't want to run to Joann's in my PJ's, we then tried rubber cement.  We found out that does take some tedious time holding the folded beak in place as the glue dries, but it did work.

Baby birds, now with beaks!
My husband suggested we try the hot glue gun after that.  It worked MUCH quicker however, mom and dad had to be the only ones to place the glue and the girls gently put the beaks on without touching the glue.  We also cut out some wings that matched the color of our baby birds.  You want to make a wing shape that has a small fold at the end, so it attaches to the slick egg surface better.


Cheep cheep
Most construction paper is only in bright primary colors.  To get our wings to color coordinate with our pastel birds, we took some pale blue paper and colored it with color crayons in a shade that was close to our birds.  Here is a whole "army" of baby birds with matching wings.


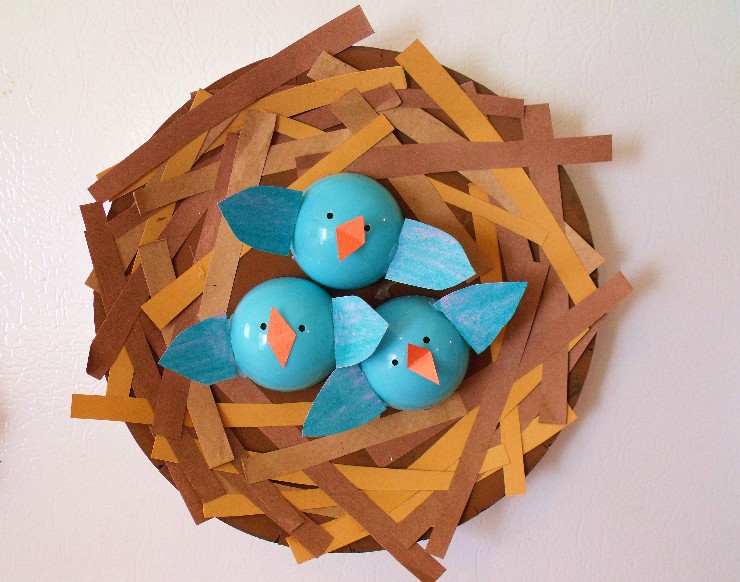
these baby birds are mighty colorful!  Love it.
While your baby chicks are setting up, it's time to cut up some brown construction paper strips for the nests.


We used two shades of brown construction paper, and I also cut up parts of a brown paper grocery bag to get a lighter brown color.  Using a glue stick this time have the kids put glue on each strip, or "twig" and layer them around the outside ring of the brown paper plate.

Messy but glorious fun
I forgot to show a nest being built in progress (we were having too much fun) however after a few layers it will start to look like a "real" nest.  We couldn't resist putting our baby birds in there to see how they liked it.


Look at these faces!!
 
mama!
Each person chose their own color birdies to make.  Even Mr. D got in on the action and made a nest too.


Top left: oldest, top right: middle child, bottom left: baby, bottom right: hubby
Since the hot glue gun was still blazing, we hot glued the birds securely in their nests.  Then, in a moment of brilliance we decided to glue a strong magnet to the back of each nest, so we could display them on the refrigerator.  How cute is this??!!

Baby bird nests lovingly displayed on the fridge
It turned out to be a great place to display our handy work.  It is such a great reminder of new life in spring time.  These were so fun to do as a family Saturday craft project.  I hope you get a chance to do them too!


No comments:

Related Posts Plugin for WordPress, Blogger...