Showing posts with label plastic canvas. Show all posts

Tuesday, May 01, 2012

Plastic Canvas - My Second Attempt

With my first plastic canvas project completed, my oldest daughter was immediately begging me to make her a purse next.  Since my first one was free style - without a pattern, I thought maybe I should find a template and see if I could follow it.  I found this template for a little purse with an easy looking pattern.  I even had that same yarn (red heart banana berry) on hand so I thought I could recreate it pretty closely.  Then I realized the narrow dimensions when I measured it out and it was very similar to the first canvas purse I made, which was tall and slim.  So again I opted to do a variation of that pattern, more wide than tall, and a bonus flap so you could close it up.  This is what I came up with:


Not to shabby eh?  My front rectangle was 40 x 30 squares in 7 pt canvas. The side strips were 30x10, the bottom strip was 40x10. The back was 40x70 to make a back plus wrap around to make the flap.  Let me show you the back, that's the first stitch I tried with the blue, green, and aqua variegated yarn


It was just a pattern (starting from the lower right corner and moving left - two lines each) of 5 squares up, then 4, 3, 2, then back up 3, 4, 5 to make that mountain/valley look.  On the next row up I did the reverse coming down.  The yarn just kept switching colors as I went along.  Nice!

When I got to what was to be the top flap of the purse, I wanted to try and new stitch, and I thought a solid color might break up the busy pattern.  I ended up choosing a "scotch" stitch and reversed the angles each time.  After a while it made this awesome diamond pattern.  I really like the way that turned out.  I solemnly vow to use this stitch again!
I love the look of this stitch.  It looks complicated without actually being too hard
Drawing inspiration from the color pallet of the variegated yarn, I decided to make the bottom a bright blue.


The sides I made a lovely turquoise color. I also trimmed the whole purse with the same color.


For the handles I used crochet.  With an H hook, I chained 44 then HDC all the way back across, ch 2 and HDC all the way back and finished off.  I threaded the finished ends on my needle and poked through the side of the bag and secured it from the inside.


The button enclosure was my daughter's idea.  She wanted something sparkly there, so I sewed the button in the center, then made a little chain and looped it, secured it to it could reach up and loop onto the button.  So I realize the colors are bright and very youth oriented, but I could do this same pattern again with some black and white checks or some sparkly silver yarn and it might look pretty classy.  


So here you have it, my first ever attempts at plastic canvas.  I love learning new ways to craft, being creative, and having fun in the process.  I can see how this medium could become so addicting, especially when little purses are just the tip of the iceberg.  The things you can make with this stuff seem endless if you are a creative type.


My next thing I want to attempt is a pre-made, PC purse form that I got at Joann's for $1.49 that looks like this and see what kind of little clutch I can make from that.  It really came with no instructions other than an tiny brochure with a few pattern pictures on it.  Wish me luck on that.  Not to mention, my third daughter is now asking for little yellow purse with daisies.  Guess I better get to work!  More soon, stay tuned....

Monday, April 30, 2012

Plastic Canvas - My first attempt

Well, I vowed to run right out and buy some plastic canvas after seeing an amazing post by Diane Gilleland on how to make some cute modern things out of the stuff, and I DID.  What a great way to use up the buckets of extra yarn I had laying around from my regular crochet crafty madness.  I also discovered plastic canvas (going to call it PC) is cheap, thus making any project I might try pretty close to free!  

The only trouble now was, what to make first?  Online there were patterns for simple bookmarks, magnets, picture frames, but I thought I'd start with something I could use, like a little bag for my cell phone that could double as a little purse for one of my girls if they took a shine to it.  I really didn't have a pattern, I decided to just cut the canvas to the dimensions of my phone and then whip stitch the pieces together to make a little bag.

Now I must warn you that I have never done plastic canvas.  I did cross stitch in high school and colllege, but technically never needlepoint before, so I don't claim to be an expert.  I just wanted to post my experience of trying to make my first project, and maybe help my niece (who lives in another state) to see how I did it.

Ok so if you are like me, you know nothing about plastic canvas... that it comes in different sizes, shapes, etc.  I found a little tutorial on beginner PC with a simple happy face pattern if you want to learn some basic terms and stitches.  I bought a few sheets of 7-count plastic canvas, which I believe is the most common size people use (There is also 5, 10, and 14 count).  The size refers to "squares per inch" so the higher the number, the smaller the squares, and the finer the stitches will be.  First gather your materials

I used red heart yarn and size 7 count plastic canvas, along with a 7 count plastic canvas needle
Also did you know that plastic canvas comes in many colors?  I wasn't sure what I wanted so I did buy some pink colored canvas but in the end opted for the regular white or "clear" canvas.  Next, I laid out my phone and measured with a ruler the size of a bag I thought it would fit in.
  
Don't mock my phone, it's a pre-smart phone.  We call them our G.E.D. phones. lol Luckily I have a cute case to cover it up

You have a few choices I figured out, you could either go by inches, or you could go by how many boxes.  Since fractions terrify me, I decided to go by number of boxes.  I used 28 across and 36 tall to fit my particular phone.  If you are making something measure around it so you know it will fit when you are done.  Next, I used the sharpie to mark where the cut lines should be and hesitantly cut out my first piece.

Cut close and straight as possible next to the canvas beam without cutting into it
Instead of measuring a 2nd time, I just used my cut out as a template and laid it down on the canvas and marker around it with the sharpie.  I also used the sides of the "front" piece to mark the length of the side sections of the bag
                               Trim off any bumpy ends                        I used the base as a measure to make the bottom the same length
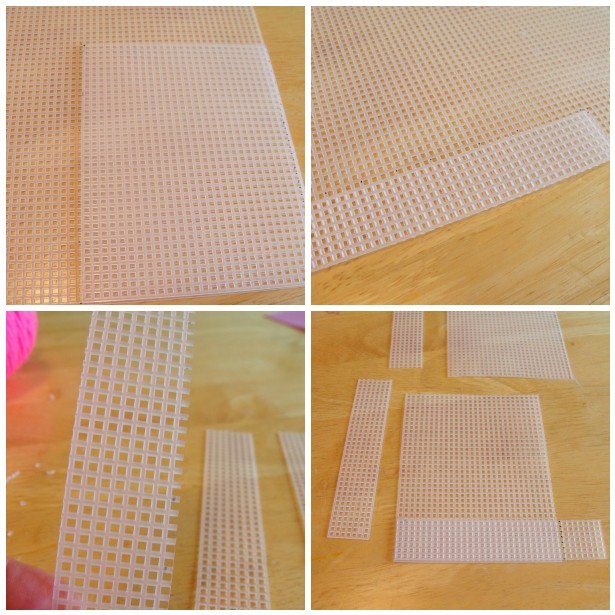
If you get an end with bumpy knobs you can just cut them off and trim close to the edge as possible.  I wanted to make sure my sides AND bottom of the bag would be the same width, so I cut three the same length and height.  But the bottom was going to be a tad shorter, so I lined up the strip, measured and cut it so it would fit perfectly with the side it was going to be attached too.

Next I laid out all my pieces in the way they would eventually be attached to each other.

Ok, now to put some yarn on the canvas.  I was nervous.  My original plan was to do squares of four in a checkered-type pattern.  So here goes nothing.  I thread my yarn in a rather long strand.  I start in the back 4 boxes up and stick the needle through, pulling it down to the box in the lower right corner.


The "tail" of the yarn I placed about an inch on the back side and stitched over it to secure the yarn to the canvas

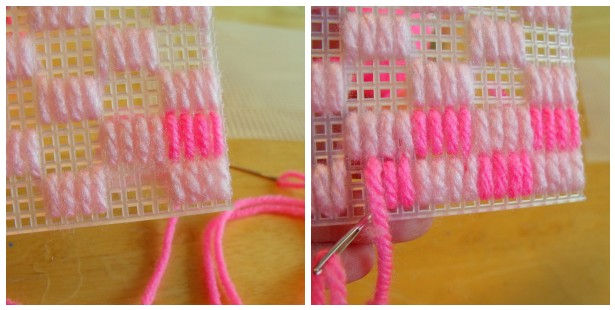
Starting from the BACK again I start up at the 4th square and bring it down to the bottom for the 2nd stitch.  My plan is to make four of these in a row to form a little light pink box.  Then I just made that a pattern, skipping four spaces to add another color later

If you go up a row for the next 4-pattern then down to the bottom row again, you will avoid a long yarn line across the back of the canvas between blocks of 4, hope that makes sense... like this _ - _-   ( instead of -  -  -  -  along the bottom)


I just kept going until the yarn ran out.  Then reloaded the needle with new yarn and kept going until the whole thing was covered in pink squares.  Then I went back with a very bright "shocking" pink and filled in the spaces I had left the same way


Soon my checkerboard pattern was taking shape.  I kept going until the whole thing was filled up.  Near the top the pattern wasn't going to end up being a full stitch like the others, so I switched to a single row type stitch to fill it up to the top.  I thought it made a nice border/ridge where the straps would go.  I guess that's the beauty of this medium.  You can design it however you want, if something isn't going to work out, you can change the plan


Next, I needed to do the sides and bottoms.  I decided to do one big long stitch down the length.  It was quick and a lot faster than the small squares.

I did this long stitch for both sides and the bottom of the bag
Now comes the attaching of things together.  Take the two pieces (I started with the front and the bottom as shown above) and hold them with the wrong sides together, right sides facing out.  Put your needle through BOTH holes and up the next hole


I must apologize for the dark picture.  I was doing this part later at night while watching TV and the lighting was weird.  If you want a more detailed pic of how to whip stitch pieces together, go to Diane's project on making a PC box, she has very clear pictures AND how to tie in loose ends

After that I stitched all the pieces together and did two simple crochet handles (chain the length you want and half double crochet back and finish off).  Attaching them was a little tricky I think next time I will attach the handles before I assemble the pieces (my phone purse was pretty narrow and hard to reach inside to tie things off)


And there you have it.  My first attempt at plastic canvas.  Cute little hot pink purse.  I have to tell you my 4-year-old took one look at this the next morning and claimed it for her own.  She's been carrying around little trinkets and treasures non stop since I finished it.  No worries.  We are about to get our first ever smart phones next week, so I will need a new sized carrying case anyway.  

So... do not be afraid of plastic canvas, go out there and try a new project today.  From the looks of it, there could be TONS of fun and useful applications you could make with this stuff!

Tuesday, April 24, 2012

New Craft Alert! - Plastic Canvas

So because of all the crocheting, let's just say I have a lot of extra yarn lying around. How much is a lot?  Well I could easily fill a few (OK, seven) large bins with different colors and types of yarn. In my defense, some were given to me, and others I have amassed on sale over the last few years.  But hey, having a large variety of colors comes in handy if, say, you need that perfect color of burgundy and cream yarn to whip up a strip of play bacon or the perfect shade of red to whip up an Angry Bird stuffed animal at a moment's notice. 


I was looking for ways to use up all this left over yarn when I came across a craft from yesteryear; plastic canvas.  One Google search will turn up tons of pictures of extensive needlepoint snowmen and Christmas ornaments from what I can only guess is the 60's and 70's? Surely there must be modern applications for such a versatile medium.  Then, I came across this blog from Diane Gilleland over at Craft: featuring something that was cute, useful, and looked fun too.  It was a custom storage bin for craft objects.  


photo by Diane Gilleland  She also has an amazing blog called CraftyPod found here

How cute is that?  Love the colors too.  Of course you don't just have to make boxes for craft supplies.  Immediately I could see using this idea in a number of cool projects.  Also, I am a total newbie to plastic canvas, Diane's play by play tutorial on how to make it looks easy and fun.  It made me want to run out and try it.

Plastic canvas art typically uses needlepoint stitches to make the designs.  I, being a former cross stitching guru back in my teens and college years feel like I can maybe pull this off without much training.  Also she suggested not just doing tedious small traditional stitches, but think outside the box at using longer stitches and even different mediums like satin ribbon or paper raffia to make unusual patterns and designs

Photo by Diane Gillelan - she is inspiring me here!
Not only are these lovely, but the long stitches would make a project wiz by in no time.  So inspiring. Plus, upon a quick search, plastic canvas is super cheap, comes in a variety of colors and sizes, and with my current supply of yarn would make projects almost free to complete!  Also this might be a great craft for kids, tweens and teens to help learn basic sewing stitches and make fun gifts for their friends and teachers.  I was so excited I called up my 13-year-old niece Maddison and told her all about this, we might even learn how to do it together.

Plus, who knew that my random find of a new interest would be so hip and in trend with the Hollywood set?  If any of you out there are Big Bang Theory fans, you will see Dr. Sheldon Cooper is the proud owner of a rubix cube tissue cover made of... gasp... plastic canvas and yarn.


Uber-geeks will be pleased to know that those are not just random squares in the correct colors, but the actual exact placement of squares if you took a real rubix cube and messed it up.  My 80's lovin' geeky hubby might need one of these really soon!


So now I'm off to the craft store to track down some plastic canvas.  I'll keep you posted...


Related Posts Plugin for WordPress, Blogger...