Friday, October 06, 2017

Baked Sloppy Joe Taquitos

I believe one of the greatest talents a mom can posses (among the many thousands), is to make leftovers into a magical, glorious new meal. No one secretly digs eating the same thing two nights in the same week, so I'm always on the look out on how to take the same ingredients and make them into something that passes as "new and exciting" for the small fry to try. 

So what did I do when I had a bit of left over Sloppy Joe meat when there just wasn't enough for a full meal with buns the 2nd time around? I remember one time years back I rolled them in crescent dough for what we called a "Classy Joe", and was declared a local hero by some, but sadly the only carb I happened to have lying about this time around was flour tortillas.  Then, the light bulb went off. Angels sang, and the taste buds rejoiced.  Introducing Sloppy Joe Taquitos!!

Sloppy Joe Taquitos - They DO say necessity is the mother of invention!

Slop-quitos? Sloppy-itos? Taquito-Joes?  Hmmm.  Once of those names should be clever enough to stick.   All you need to make these bad boys is some left over Sloppy Joe meat, some flour tortillas, a little shredded cheese, cooking spray, a cooking sheet and salt.

You're gonna want to make these

 I started by covering a cookie sheet with tin foil and coating with cooking spray

If you have small flour tortillas, just cut them in half, if you have the huge burrito sized tortillas, cut the edges off the tortillas and then in half to make a pile of rectangles.  


Place a little bit of Sloppy Joe meat in a line at one end.  Add a tiny bit of shredded cheese and roll up the taquito while pushing down (to squish the meat to the ends of the roll) as you go ( I had the smaller tortillas this time so I just cut them in half).

Good pressure while rolling will force the meat out to the ends of the tube.
Place seem side down on the cookie sheet covered in foil until you have a full pan of Taquito-Joes.

These are rather haphazard - I was actually trying to get dinner on the table and blog pics were a quick afterthought
Lightly spray with cooking spray over the top of the taquitos (or melted butter if you prefer) and then crank some sea salt over the tops of the Slop-quitos.  I might have to take a vote at the end, which name do you love best?

Bake at 425º for 20 minutes until golden brown and crisp 

These crunch up so nicely when you bake at 425º! No frying needed.
Don't be freaked if some of the Sloppy Joe filling oozes out the end. It tends to bake to the pan and make these lovely ooey-gooey ends.

Not pretty, but delicious!
After that, pop a few on the plate and sit back and wait for the "Ooos and Ahhs".

Taquito-Joes - You are welcome taste buds!
Okay, not so much of the Ooos and aahhs... you'll probably get a few side eyes and a "hey mom what IS this" look from your youngest, but when you explain it's their beloved Sloppy Joes in their favorite Mexican form (two worlds uniting as one)... you might even get a THANK YOU!

You are welcome children - you are lucky mommy is a genius
You can pick them up and eat them with your fingers (always a plus with the youngins), although at least one of mine topped it with some extra cheese - and I have to ask myself, well why not!?

Sloppy Joe Taquitos - hey the original at least rhymes.

All and all these were a big hit!  If you are interested in our regular chicken taquitos, click here, which are also well loved around here.  So let me know what you think I should call these crazy things, other than that it's going on my very short list of "things my kids will eat and not complain about"!  Yay for me.  Enjoy.


Friday, September 22, 2017

Corner to Corner Crochet - Blanket

I took a small break from crochet. I was up to my eyeballs in yarn there for a while, plus, with our extra hot summer, hanging out with a bunch of thermal yarn in your lap was only going to make me extra warm, which is a big no bueno in my book. It took seeing a cute blanket on Pinterest to completely inspire me. Not only was the pattern intriguing, but the colors were absolutely beautiful. Behold, my first attempt at corner to corner crochet.

Corner to Corner crochet
By the way, you can find the free pattern and tips for making this blanket by Susan Carlson on her blog "Felted Button" here... and the yarn is called "candied" by Red Heart Boutique Unforgettable Yarn, which is pretty much gorgeous, and can be purchased at craft stores like Joann's, and also in multipaks at Amazon


Because of the increasing (or decreasing at the end of each row), I would consider this blanket at the intermediate level. Just as a personal tip, I also watched a number of YouTube videos to make sure I had started the pattern of increasing correctly before getting too far into the project.

The thing about crocheting any blanket typically is... it's super boring. Seriously. You get the initial chain stitch down for as wide as the blanket needs to be, and then go back and forth, back and forth, same number of rows and columns, repeating the same crochet pattern over and over until a blanket starts to form. This is great if you are on a plane, or in a waiting room somewhere and don't want to count rows, but for me, after a day or two, the endless back and forth feels more like a drudgery to me than a fun crafty side project.  Enter in corner to corner crochet!

My first attempt at corner to corner.  Hook used is a 5.0 mm (H) Crochet hook
Corner to corner does just that, it starts in the corner.  You need to add a row of increase at the end of every row, which is just enough to keep you interested and your mind sharp.

Corner to corner, this got me really excited when I saw the rows change on their own.
The other awesome thing about corner to corner, is that if you pick a yarn that has a slow color change, you won't need to switch colors all the time (and tie off loose ends, my least favorite part of a complicated blanket). The yarn magically and gradually changes into one beautiful color after the next.  

The most beautiful pile of pastel rainbow yarn ever
You just keep increasing rows as your triangle wedge grows...

It's working, it's really working!
until it gets wider and wider, and you need your tween daughter to hold it up for a picture.

Thanks for helping me Vivi!
I will admit I did get a bit persnickety in the middle of the blanket about not wanting two rows to be the same color. When I saw the pattern might make two rows of the exact same pink shade near the same part of the blanket, I would cut and tie off the yarn at one end, pull a few feet out of the working yarn, and start the new color so it wouldn't sync up later in the pattern.  

Oh and be it noted, no matter how warm it is outside, crochet will attract your kitties, they love to "help" by laying directly on your work.

Haley, the softest kitty in the known universe (aka Fluffy butt) "helping" me crochet
When you get as wide as you think you want to go, now is the time to switch it up, and start decreasing each row.  This keeps you mentally on your toes and helps minimizing boredom. I also went to YouTube to make sure I was doing this correctly. 

Decreasing suddenly makes a square edge appear along the sides - neato!
It's fun to see the rows shrink and shrink until all you have left to do is to put an edge on it, and tie off the loose ends (you'll still have some - just not as many as if you switched rows every color).

Tying off loose ends... it's actually quite the task
Then you can sit back and admire your work.  This was the first time I could lay it out on the floor and take a step back.  It was awesome how the color change of the yarn made the most excellent stripes, and almost gave it an optical illusion effect.

Rainbow stripes o'plenty

Here is it draped over a chair.  I just love how it turned out!


The next day I took it outside to get some shots of the colors "in the wild".


Unicorns would definitely approve of this blanket, so many colors!

Candied yarn - love the color changes!
From sea to shining sea it's color mania.  Oh and the border on this pattern gave it a nice solid edge, and actually made two different variations, depending on which side of the blanket you are looking at.

Flat facing on the front of the blanket, loops on the back side border.

This blanket is warm and soft, but not too heavy.  It's perfect for family movie nights in our new chair. It was immediately claimed by my eldest, as you can see here... she's ready for a bowl of popcorn.

Vivian says this blanket is "hers" now.
This was a really fun, and really beautiful blanket to make. Red Heart Unforgettable yarn is not only super soft, but comes in a bunch of beautiful slow color change patterns. I was thinking about picking a new color scheme and making a second one actually. Feel free to post any projects you are working on, and... Winter is coming... so happy crochet everyone!

Monday, September 04, 2017

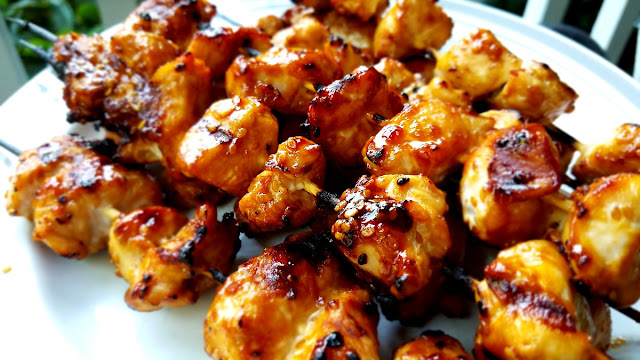
Pineapple Teriyaki Chicken Skewers (2 ingredients)

Sometimes you need to throw a quick dinner together, and using a pre-made glaze that cuts the time on your meal prep way down.  On mother's day we made ribs in the pressure cooker with a Jack Daniel's honey brown sugar sauce (they were amazing, recipe here), while my dad tried his own pressure cooker ribs using a delicious pineapple teriyaki glaze/marinade. We liked the flavor so much that I thought it would work really well on grilled chicken skewers.

Pineapple Teriyaki Chicken Skewers
These skewers are easy. You will need:

Chicken breasts (cut into 1 inch cubes)
Kona Hawaiian Pineapple Teriyaki Glaze (found at Fred Meyer and Walmart)

So much yum in one little jar
You will also need some wooden skewers that have been soaking it water for about 15 minutes (so they don't char).  Optional would also be cut up fresh fruit/veggies to add to the skewers (bell peppers, onion, chunks of pineapple)

Chop your chicken breasts into cubes and marinate the meat in some of the Pineapple Teriyaki glaze for at least 30 minutes.  I also added some seasoning (salt and pepper).

Let the chicken marinate in the fridge until you are ready to put them on skewers

Next add the chicken chunks onto the wooden skewers that have been soaking in water

We did just meat the first time around, but these would be awesome with chunks of bell pepper, onions, and pineapple
This is usually where I hand things off to my hubby to grill on the BBQ. He says he turns the grill on high to preheat, turns it down to medium, then puts the skewers on with the ends hanging off the grill (so the wood doesn't burn). Grill about 3 minutes per side while "keeping an eye on it" (his words) and brush on extra glaze on as they are cooking.
Chicken skewers hot off the grill
While he's grilling the skewers I usually whip up a couple of sides. Rice and some slices of watermelon and we are ready to go.

Pineapple Teriyaki goodness - love the grill marks
 A quick, easy dinner that looked awesome and tasted great.


Easy and yummy are my favorite combination!


Normally I'd do a printed link to the recipe, but with only two main ingredients, this one is self explanatory.  Enjoy!


Sunday, August 20, 2017

Instant Pot Creme Brulee

One of my favorite desserts to order in a restaurant is creme brulee.  What's not to love about creamy cool vanilla custard topped with a crunchy candy sugar shell that you have to tap with your spoon to break open to reveal that creamy goodness center? So delicious and fancy! Have I ever, pray tell, made this delectable creme brulee for myself you ask? Well no. I have this irrational fear of tempering eggs. Don't ask my why, I blog about food, I love cooking, I'm addicted to the Food Network, but for some reason the fear of unintentionally scrambling eggs into my desserts have kept me away from my attempting to make my absolute favorite.  Enter the Instant Pot. I found a recipe on their community Facebook page that eliminates that pesky "tempering of the egg" fear and makes it stupid easy.

My absolute favorite!  Creme Brulee!

You will need:
(Recipe posted by a gal named Heidi Miller on the Instant Pot Facebook page)

5 egg yokes
1/2 cup sugar
1 tablespoon vanilla extract
2 cups of heavy cream 

You will also need six 6 oz ramekins, and Instant Pot, the inner trivet, and water.  Upon advice from the Facebook page, I purchase my ramekins in a set of eight at amazon here.  I was extra stoked they came in a beautiful light teal color that matched my new kitchen. They have other colors as well.

Add 5 egg yokes to a bowl.  


Add 1/2 cup of sugar


Whisk together


Add 2 cups of heavy cream and 1 Tablespoon of vanilla


And mix together until smooth.


Pour into six 6 oz ramekins a little above mid way
This recipe will do exactly 6 ramekins, the most that will fit in the 6 qt pot
Cover ramekins tightly with foil.  I cut out squares that just fit over the round surface and sealed each one as tightly as I could

Make sure these are sealed around the edges as much as possible
Pour 2 cups of water into the bottom of the Instant Pot and cover with the trivet.  Stack the first three ramekins on the bottom.

A perfect fit
And then stack the next three ramekins balancing them on top of the first row.

All snug as a bug in a rug
Set the Instant Pot for manual for 13 minutes.  The most important part is to let the pot do a natural release.  That means, DON'T touch it until it depressurizes by itself and the tab on the top pops down by itself.  I made these twice, the first time I let it naturally release and they turned out great.  The second time I was impatient and released a little early. What it made was a big mess as the brulee inside the ramekins came up under the foil and made a sticky mess.  They were much uglier and very sticky.  

We still ate them of course, (for science) 

 
But all in all, the first batch following the rules turned out much better!

Cool at room temperature for 30 minutes then chill for 4 hours minimum.  

These are great if you want to make them ahead the day before and chill overnight
Pull them out of the fridge and remove the foil.

Hey that's lookin' pretty good!
Dust the top of each ramekin with a coating of sugar.  We used regular table sugar.
Looks like it snowed
Use a mini cooking blow torch to brulee the tops, which will turn brown and form a hard candy-type shell.  

If you don't have a torch, you can broil these in the over for a few minutes until they turn golden
My hubby gave me this blow torch almost 10 years ago in the hopes I would one day make creme brulee. I'm so glad his wishes have come true. I'm not gonna lie, firing this bad boy up was quite the thrill.
Burn baby, burn!
 Give each brulee it's final coat.

Man that was fun
 The only thing left after that is to admire your work... and EAT it.

Holy yum, Batman.
 Tap the outer shell and scoop up some of that vanilla custard inside

It makes a satisfying crunch sound as your break through to the creamy goodness below
I will say, that without tempering the eggs, the texture might not be as super-de-duper smooth as you would get in a fancy-dancy restaurant, however the flavor is still awesome. Very creamy and super tasty.  I'd consider this a "rustic" brulee.


Yummy!
I will SO make this again...and it's nice I can do it now WHENEVER I want from the comforts of home!  

Instant Pot Creme Brule
Enjoy. 


Related Posts Plugin for WordPress, Blogger...