Friday, September 22, 2017

Corner to Corner Crochet - Blanket

I took a small break from crochet. I was up to my eyeballs in yarn there for a while, plus, with our extra hot summer, hanging out with a bunch of thermal yarn in your lap was only going to make me extra warm, which is a big no bueno in my book. It took seeing a cute blanket on Pinterest to completely inspire me. Not only was the pattern intriguing, but the colors were absolutely beautiful. Behold, my first attempt at corner to corner crochet.

Corner to Corner crochet
By the way, you can find the free pattern and tips for making this blanket by Susan Carlson on her blog "Felted Button" here... and the yarn is called "candied" by Red Heart Boutique Unforgettable Yarn, which is pretty much gorgeous, and can be purchased at craft stores like Joann's, and also in multipaks at Amazon


Because of the increasing (or decreasing at the end of each row), I would consider this blanket at the intermediate level. Just as a personal tip, I also watched a number of YouTube videos to make sure I had started the pattern of increasing correctly before getting too far into the project.

The thing about crocheting any blanket typically is... it's super boring. Seriously. You get the initial chain stitch down for as wide as the blanket needs to be, and then go back and forth, back and forth, same number of rows and columns, repeating the same crochet pattern over and over until a blanket starts to form. This is great if you are on a plane, or in a waiting room somewhere and don't want to count rows, but for me, after a day or two, the endless back and forth feels more like a drudgery to me than a fun crafty side project.  Enter in corner to corner crochet!

My first attempt at corner to corner.  Hook used is a 5.0 mm (H) Crochet hook
Corner to corner does just that, it starts in the corner.  You need to add a row of increase at the end of every row, which is just enough to keep you interested and your mind sharp.

Corner to corner, this got me really excited when I saw the rows change on their own.
The other awesome thing about corner to corner, is that if you pick a yarn that has a slow color change, you won't need to switch colors all the time (and tie off loose ends, my least favorite part of a complicated blanket). The yarn magically and gradually changes into one beautiful color after the next.  

The most beautiful pile of pastel rainbow yarn ever
You just keep increasing rows as your triangle wedge grows...

It's working, it's really working!
until it gets wider and wider, and you need your tween daughter to hold it up for a picture.

Thanks for helping me Vivi!
I will admit I did get a bit persnickety in the middle of the blanket about not wanting two rows to be the same color. When I saw the pattern might make two rows of the exact same pink shade near the same part of the blanket, I would cut and tie off the yarn at one end, pull a few feet out of the working yarn, and start the new color so it wouldn't sync up later in the pattern.  

Oh and be it noted, no matter how warm it is outside, crochet will attract your kitties, they love to "help" by laying directly on your work.

Haley, the softest kitty in the known universe (aka Fluffy butt) "helping" me crochet
When you get as wide as you think you want to go, now is the time to switch it up, and start decreasing each row.  This keeps you mentally on your toes and helps minimizing boredom. I also went to YouTube to make sure I was doing this correctly. 

Decreasing suddenly makes a square edge appear along the sides - neato!
It's fun to see the rows shrink and shrink until all you have left to do is to put an edge on it, and tie off the loose ends (you'll still have some - just not as many as if you switched rows every color).

Tying off loose ends... it's actually quite the task
Then you can sit back and admire your work.  This was the first time I could lay it out on the floor and take a step back.  It was awesome how the color change of the yarn made the most excellent stripes, and almost gave it an optical illusion effect.

Rainbow stripes o'plenty

Here is it draped over a chair.  I just love how it turned out!


The next day I took it outside to get some shots of the colors "in the wild".


Unicorns would definitely approve of this blanket, so many colors!

Candied yarn - love the color changes!
From sea to shining sea it's color mania.  Oh and the border on this pattern gave it a nice solid edge, and actually made two different variations, depending on which side of the blanket you are looking at.

Flat facing on the front of the blanket, loops on the back side border.

This blanket is warm and soft, but not too heavy.  It's perfect for family movie nights in our new chair. It was immediately claimed by my eldest, as you can see here... she's ready for a bowl of popcorn.

Vivian says this blanket is "hers" now.
This was a really fun, and really beautiful blanket to make. Red Heart Unforgettable yarn is not only super soft, but comes in a bunch of beautiful slow color change patterns. I was thinking about picking a new color scheme and making a second one actually. Feel free to post any projects you are working on, and... Winter is coming... so happy crochet everyone!

Monday, September 04, 2017

Pineapple Teriyaki Chicken Skewers (2 ingredients)

Sometimes you need to throw a quick dinner together, and using a pre-made glaze that cuts the time on your meal prep way down.  On mother's day we made ribs in the pressure cooker with a Jack Daniel's honey brown sugar sauce (they were amazing, recipe here), while my dad tried his own pressure cooker ribs using a delicious pineapple teriyaki glaze/marinade. We liked the flavor so much that I thought it would work really well on grilled chicken skewers.

Pineapple Teriyaki Chicken Skewers
These skewers are easy. You will need:

Chicken breasts (cut into 1 inch cubes)
Kona Hawaiian Pineapple Teriyaki Glaze (found at Fred Meyer and Walmart)

So much yum in one little jar
You will also need some wooden skewers that have been soaking it water for about 15 minutes (so they don't char).  Optional would also be cut up fresh fruit/veggies to add to the skewers (bell peppers, onion, chunks of pineapple)

Chop your chicken breasts into cubes and marinate the meat in some of the Pineapple Teriyaki glaze for at least 30 minutes.  I also added some seasoning (salt and pepper).

Let the chicken marinate in the fridge until you are ready to put them on skewers

Next add the chicken chunks onto the wooden skewers that have been soaking in water

We did just meat the first time around, but these would be awesome with chunks of bell pepper, onions, and pineapple
This is usually where I hand things off to my hubby to grill on the BBQ. He says he turns the grill on high to preheat, turns it down to medium, then puts the skewers on with the ends hanging off the grill (so the wood doesn't burn). Grill about 3 minutes per side while "keeping an eye on it" (his words) and brush on extra glaze on as they are cooking.
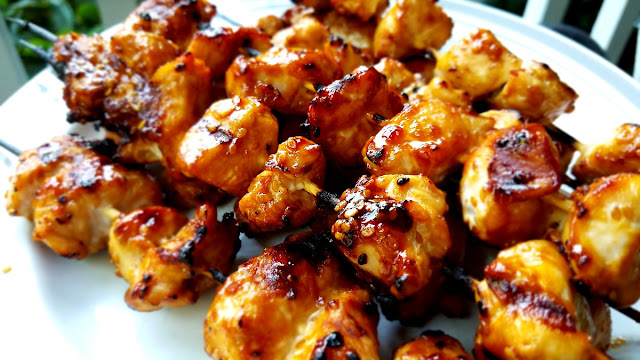
Chicken skewers hot off the grill
While he's grilling the skewers I usually whip up a couple of sides. Rice and some slices of watermelon and we are ready to go.

Pineapple Teriyaki goodness - love the grill marks
 A quick, easy dinner that looked awesome and tasted great.


Easy and yummy are my favorite combination!


Normally I'd do a printed link to the recipe, but with only two main ingredients, this one is self explanatory.  Enjoy!


Related Posts Plugin for WordPress, Blogger...