
The only trouble now was, what to make first? Online there were patterns for simple bookmarks, magnets, picture frames, but I thought I'd start with something I could use, like a little bag for my cell phone that could double as a little purse for one of my girls if they took a shine to it. I really didn't have a pattern, I decided to just cut the canvas to the dimensions of my phone and then whip stitch the pieces together to make a little bag.
Now I must warn you that I have never done plastic canvas. I did cross stitch in high school and colllege, but technically never needlepoint before, so I don't claim to be an expert. I just wanted to post my experience of trying to make my first project, and maybe help my niece (who lives in another state) to see how I did it.
Ok so if you are like me, you know nothing about plastic canvas... that it comes in different sizes, shapes, etc. I found a little tutorial on beginner PC with a simple happy face pattern if you want to learn some basic terms and stitches. I bought a few sheets of 7-count plastic canvas, which I believe is the most common size people use (There is also 5, 10, and 14 count). The size refers to "squares per inch" so the higher the number, the smaller the squares, and the finer the stitches will be. First gather your materials
 |
| I used red heart yarn and size 7 count plastic canvas, along with a 7 count plastic canvas needle |
 |
| Don't mock my phone, it's a pre-smart phone. We call them our G.E.D. phones. lol Luckily I have a cute case to cover it up |
You have a few choices I figured out, you could either go by inches, or you could go by how many boxes. Since fractions terrify me, I decided to go by number of boxes. I used 28 across and 36 tall to fit my particular phone. If you are making something measure around it so you know it will fit when you are done. Next, I used the sharpie to mark where the cut lines should be and hesitantly cut out my first piece.
 |
| Cut close and straight as possible next to the canvas beam without cutting into it |
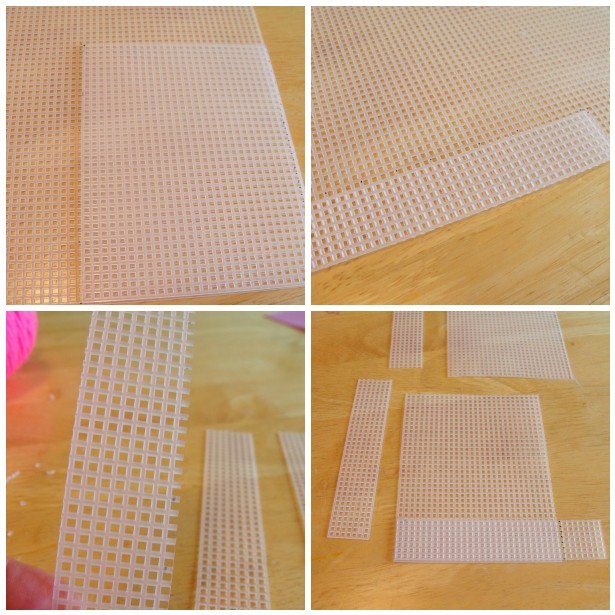 |
| Trim off any bumpy ends I used the base as a measure to make the bottom the same length |
Next I laid out all my pieces in the way they would eventually be attached to each other.

Ok, now to put some yarn on the canvas. I was nervous. My original plan was to do squares of four in a checkered-type pattern. So here goes nothing. I thread my yarn in a rather long strand. I start in the back 4 boxes up and stick the needle through, pulling it down to the box in the lower right corner.
 |
| The "tail" of the yarn I placed about an inch on the back side and stitched over it to secure the yarn to the canvas |
Starting from the BACK again I start up at the 4th square and bring it down to the bottom for the 2nd stitch. My plan is to make four of these in a row to form a little light pink box. Then I just made that a pattern, skipping four spaces to add another color later
 |
| If you go up a row for the next 4-pattern then down to the bottom row again, you will avoid a long yarn line across the back of the canvas between blocks of 4, hope that makes sense... like this _ - _- ( instead of - - - - along the bottom) |
I just kept going until the yarn ran out. Then reloaded the needle with new yarn and kept going until the whole thing was covered in pink squares. Then I went back with a very bright "shocking" pink and filled in the spaces I had left the same way
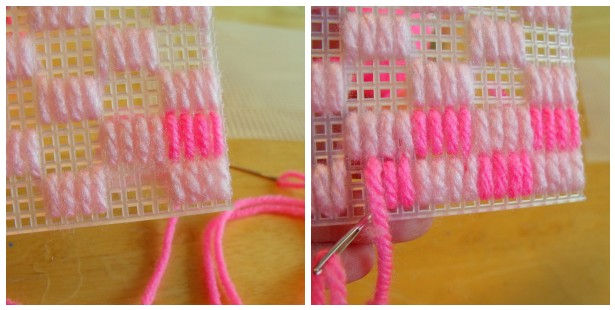
Soon my checkerboard pattern was taking shape. I kept going until the whole thing was filled up. Near the top the pattern wasn't going to end up being a full stitch like the others, so I switched to a single row type stitch to fill it up to the top. I thought it made a nice border/ridge where the straps would go. I guess that's the beauty of this medium. You can design it however you want, if something isn't going to work out, you can change the plan

Next, I needed to do the sides and bottoms. I decided to do one big long stitch down the length. It was quick and a lot faster than the small squares.
 |
| I did this long stitch for both sides and the bottom of the bag |

I must apologize for the dark picture. I was doing this part later at night while watching TV and the lighting was weird. If you want a more detailed pic of how to whip stitch pieces together, go to Diane's project on making a PC box, she has very clear pictures AND how to tie in loose ends
After that I stitched all the pieces together and did two simple crochet handles (chain the length you want and half double crochet back and finish off). Attaching them was a little tricky I think next time I will attach the handles before I assemble the pieces (my phone purse was pretty narrow and hard to reach inside to tie things off)

And there you have it. My first attempt at plastic canvas. Cute little hot pink purse. I have to tell you my 4-year-old took one look at this the next morning and claimed it for her own. She's been carrying around little trinkets and treasures non stop since I finished it. No worries. We are about to get our first ever smart phones next week, so I will need a new sized carrying case anyway.
So... do not be afraid of plastic canvas, go out there and try a new project today. From the looks of it, there could be TONS of fun and useful applications you could make with this stuff!
Make a rubic cube! Do it!!! Easter baskets?
ReplyDeleteMuy hermoso bolso, donde puedo comprar ese plástico Canvas, vivo Barquisimeto. Edo Lara. Venezuela
ReplyDelete